Hi Guys,
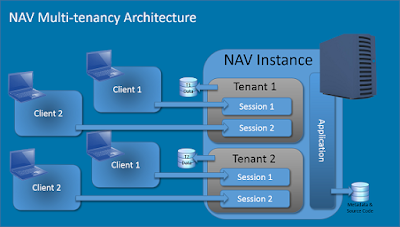
In this post, I will explain the steps involved in creating a multi-tenant environment in NAV.
I will work with NAV 2016 Demo database for this walkthrough. Yes ,this process includes using PowerShell! So, this may brush our PowerShell skills as well. (You may go around Waldo's blog, if you really want to explore things with powershell).
First and foremost we need to Import the NAV admin tool to PowerShell. Then follow the steps below,
Step 1: We need to stop the service (which is linked to the database for which we want to create tenants) from NAV administration server. Alternatively, we can do it from PowerShell as well. By using the following cmdlet we can stop the NAV service.
Step 2: Separate application database from business database (Know More about Application Vs Business Database). We need to execute the following cmdlet to perform this operation,
Export-NAVApplication –DatabaseServer 'MyServer’ –DatabaseInstance ‘NavDemo’ –DatabaseName ‘My Database’ –DestinationDatabaseName ‘My Database App’
('NavDemo' is the name of the SQL server instance. This parameter is optional. If you're not using SQL instances then you may exclude this parameter.)
Paste this cmdlet in script pane, modify the cmdlet parameters as required and then press F5. Once this cmdlet executes, you will be able to see a separate database in the database server with the name you entered against Destination Database Name ('My Database App' in the above example).
Step 3: The original database still contains the application tables. So, we need to remove application tables from this database. To do this, we may execute the following cmdlet,
Remove-NAVApplication –DatabaseServer ‘MyServer’ –DatabaseInstance ‘NavDemo’ –DatabaseName ‘Demo Database NAV (9-0)’
Remember: Once this cmdlet executes. Then this process is irrevesible, you can not import the application tables back to the original database. So, Make sure to keep a full backup of this database available.

In this post, I will explain the steps involved in creating a multi-tenant environment in NAV.
I will work with NAV 2016 Demo database for this walkthrough. Yes ,this process includes using PowerShell! So, this may brush our PowerShell skills as well. (You may go around Waldo's blog, if you really want to explore things with powershell).
First and foremost we need to Import the NAV admin tool to PowerShell. Then follow the steps below,
Step 1: We need to stop the service (which is linked to the database for which we want to create tenants) from NAV administration server. Alternatively, we can do it from PowerShell as well. By using the following cmdlet we can stop the NAV service.
Set-NAVServerInstance –ServerInstance ‘DynamicsNAV90’ -stop
Paste the above cmdlet in powershell script pane and press F5 to stop the service. And you must verify the same by opening Dynamics NAV Server (i.e NAV Administration).Step 2: Separate application database from business database (Know More about Application Vs Business Database). We need to execute the following cmdlet to perform this operation,
Export-NAVApplication –DatabaseServer 'MyServer’ –DatabaseInstance ‘NavDemo’ –DatabaseName ‘My Database’ –DestinationDatabaseName ‘My Database App’
('NavDemo' is the name of the SQL server instance. This parameter is optional. If you're not using SQL instances then you may exclude this parameter.)
Paste this cmdlet in script pane, modify the cmdlet parameters as required and then press F5. Once this cmdlet executes, you will be able to see a separate database in the database server with the name you entered against Destination Database Name ('My Database App' in the above example).
Step 3: The original database still contains the application tables. So, we need to remove application tables from this database. To do this, we may execute the following cmdlet,
Remove-NAVApplication –DatabaseServer ‘MyServer’ –DatabaseInstance ‘NavDemo’ –DatabaseName ‘Demo Database NAV (9-0)’
Remember: Once this cmdlet executes. Then this process is irrevesible, you can not import the application tables back to the original database. So, Make sure to keep a full backup of this database available.
Paste this cmdlet in script pane, modify the parameters as required and then press F5. When you will press F5, a confirmation dialog like the below will appear,
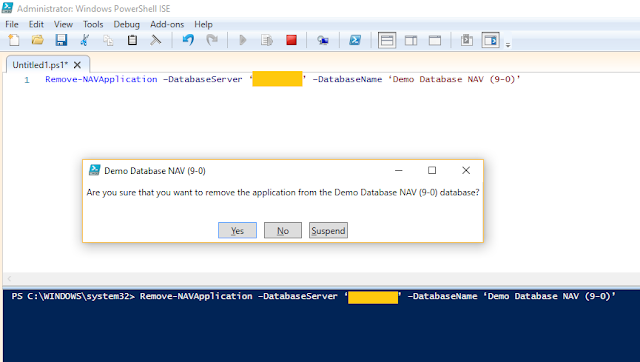

Click yes and proceed. Once the application tables are removed from the original database, you will not be able to open this database from Development Environment.
Step 4: Now we need to remove the Database name from NAV service which we stopped in Step 1. Execute the following cmdlet to do so,
Set-NAVServerConfiguration –ServerInstance ‘DynamicsNAV90’ –element appSettings –KeyName ‘DatabaseName’ –KeyValue ‘’
You may check the NAV administration server, the database name will be removed from the service name specified in above command.
Step 5: Now we need to mount the App database to the NAV service and then mount the Business database as a tenant to this service.
Note: Tenants sub-heading is (created under the Service on which the original database was mounted) at the moment we export the application tables from business database to a dedicated app database.
The following cmdlets will start the service, mount App database to NAV Service and mount Business database as a tenant to this NAV service.
Set-NAVServerInstance –ServerInstance ‘DynamicsNAV90’ -Start
Mount-NAVApplication –ServerInstance ‘DynamicsNAV90’ –DatabaseServer ‘MyServer\NAVDEMO’ –DatabaseName ‘NAV App’
Mount-NAVTenant –ServerInstance ‘DynamicsNAV90’ -Id tenant1 –DatabaseServer ‘MyServer\NAVDEMO’ -DatabaseName ‘Demo Database NAV (9-0)’ -OverwriteTenantIdInDatabase
Open the NAV administration server and check the database and tenant will be mounted as expected, if everything went well.
Please share your comments and queries, if you have any, I will be glad to answer them.Thanks.#KnowledgeForNAVTechies
No comments:
Post a Comment